How to Fix Overexposed Photos: 4 Methods That Work
A bright, washed-out photo isn't automatically lost. The face still has shape. The flower still has edges. The sky has some faint gradient left. What matters isn't how the photo looks on screen right now — it's how much data the original file actually contains.
This guide covers four practical methods for fixing overexposed photos: AI repair for anyone who needs a result in under two minutes, Lightroom for RAW files with serious recovery potential, the iPhone Photos app for quick mobile fixes, and Photoshop for precise manual control. Each method fits a different situation and a different skill level.
Dedicated AI-only overexposure repair guide
Key Takeaways
- RAW camera files contain two to three extra stops of highlight data that appear blown in JPEG previews — Lightroom accesses this data and often recovers detail that looks completely lost.
- AI tools fix overexposed JPEGs without any editing skills and deliver results in under two minutes.
- Over-darkening the whole image is the most common fix mistake: it crushes shadows and makes the photo look worse than the overexposed original.
What Actually Causes Photo Overexposure?
Overexposure happens when too much light reaches the camera sensor during the exposure. The most common causes are shooting in direct sunlight without dialing in negative exposure compensation, a camera or phone that meters off a dark subject and overexposes the bright background, and flash firing at full power in a small or reflective room.
The result is predictable: highlight areas get pushed toward white. Faces look pale and flat. Skies go blank. Flowers lose their color. The damage follows a predictable pattern based on which parts of the scene received the most light.
Whether you can fix it depends on one factor: did the sensor capture any information in those bright areas, or is the data gone? Areas with some faint detail remaining — even a subtle color gradient or soft edge — can often be recovered. Pure white with zero variation cannot.
Why portrait photos get overexposed specifically
Before You Start: Check What You're Working With
Open the photo and look closely at the highlights. If you can see any faint edges, subtle color shifts, or a gradient in the bright areas, the photo has recoverable data. If the brightest zones are completely flat white with no variation at all, those specific spots won't recover — but the rest of the image can still be improved considerably.
Check the file you're starting from. The original camera or phone file always contains more information than a social media download, a screenshot, or a compressed copy. Every re-save and re-export discards some of the faint highlight gradients that recovery depends on. If you have the original, use it.
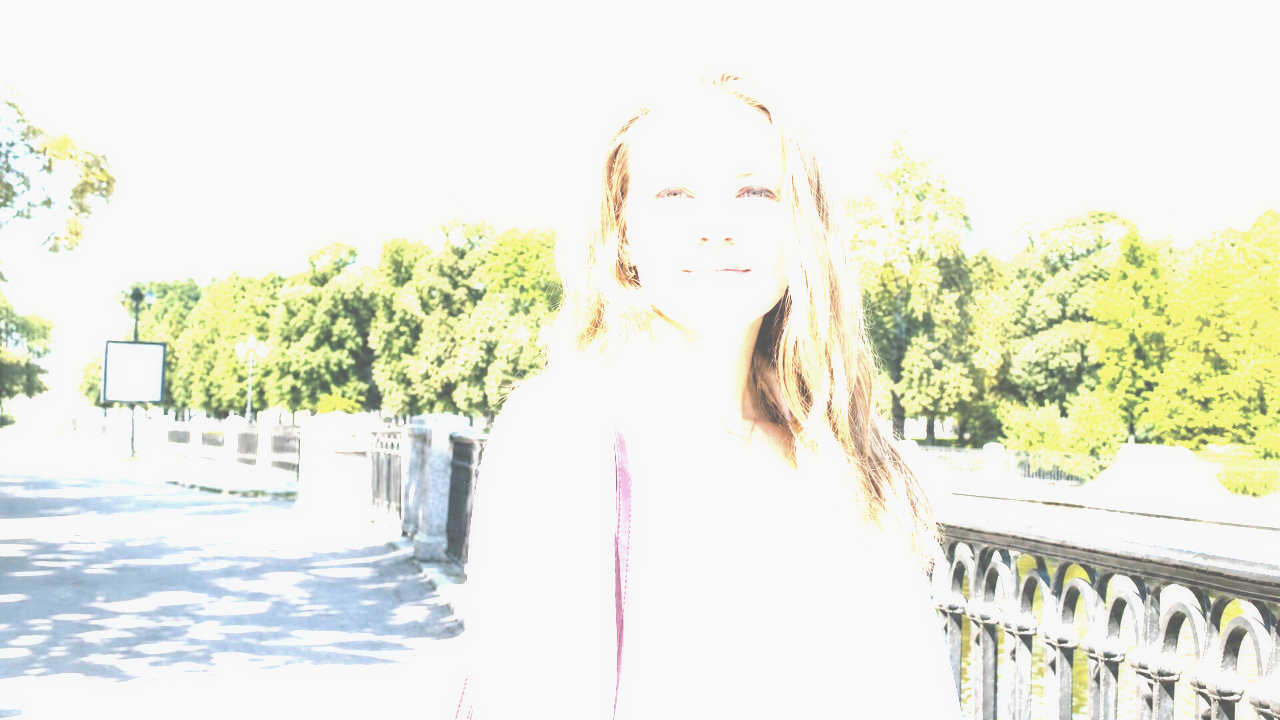
When testing recovery on a severely overexposed outdoor portrait, the difference between the original phone file and a screenshot shared through iMessage was striking. The original recovered skin texture and sky detail convincingly. The screenshot result looked gray and muddy — the compression had already destroyed the faint highlight gradients before repair even began. Always start from the best file you have.
Method 1: AI Repair — Fastest for JPEGs
AI repair is the right starting point when you have a JPEG, when you don't want to open an editing app, or when you need results in under two minutes. Tools like FixPicAI analyze the whole scene, reduce highlights selectively, rebuild contrast, and restore natural color — without any slider adjustments on your part.
Steps to fix an overexposed photo with AI:
- Go to FixPicAI and upload the original file, not a screenshot or compressed download
- Choose a repair mode: Natural for moderate overexposure, Strong for severe glare or very bright conditions, Portrait specifically when a face is the main subject
- Wait about two minutes for AI processing
- Compare the before and after result using the slider
- Download the fixed photo before your session expires
AI repair works on JPEGs and PNGs. It doesn't access RAW sensor data — which is what makes Lightroom a better choice when you have the original camera file. But for most JPEG situations, AI gets you to a good result quickly without any setup or editing knowledge.
Choosing the right mode matters. Portrait mode targets highlight reduction around the face first, which protects identity and expression while still correcting the overall scene. Natural mode works best as a starting point for landscapes, flowers, and product photos. Strong mode is for images where blown highlights cover a large portion of the frame.
Complete AI overexposure repair walkthrough
Method 2: Lightroom or Camera Raw — Best for RAW Files
Lightroom is the strongest tool for fixing overexposed photos when you have the original camera RAW file. RAW files encode the actual sensor data before in-camera processing compresses it, which means highlights that look completely blown in the JPEG preview can often be recovered by adjusting just a few sliders.
RAW camera files retain two to three additional stops of highlight data beyond what the JPEG preview shows. This is the data that Lightroom's Highlights slider reaches into. A portrait that looks like washed-out white in the JPEG preview can reveal skin texture, color gradient, and edge detail once the Highlights slider is pulled to -100 — data that was always in the RAW file, just hidden behind the preview rendering.
Adjust these five sliders in this order:
- Highlights: drag to -100 — The most impactful step. On a RAW file, this step alone often reveals texture and color in areas that looked completely lost in the original view.
- Whites: drag to -40 or lower — Brings the absolute white point back into a range where color and detail can exist. Keep going until whites look clean but not gray.
- Exposure: -0.5 to -1.0 EV — Reduces overall brightness only if the highlights adjustment wasn't enough. Use this one sparingly; it affects everything.
- Shadows: +10 to +20 — After darkening the highlights, shadows can look heavy. Lifting them slightly keeps the image feeling open.
- Clarity: +10 to +15 — Restores the micro-contrast that overexposure typically flattens across the image.
The slider order matters more than most tutorials explain. Moving Exposure down before touching Highlights applies uniform darkening to the entire image — shadows go flat and the photo looks underexposed rather than corrected. Starting with Highlights preserves the midtone structure, so any Exposure adjustment you need afterward is smaller and the result looks more balanced. The same file produces a noticeably different result depending on which slider you move first.
Tone Curve for finer control: After sliders, open the Tone Curve and add a point in the upper-right quarter. Drag it slightly downward. This darkens highlights with a gentle slope that looks more natural than the slider alone. Use it lightly — a small curve adjustment after sliders goes further than you might expect.
The same slider controls work in Adobe Camera Raw (ACR) accessed through Photoshop's Filter menu, which is useful if you're already in Photoshop and want Lightroom-style precision without switching applications.
Deep dive into recovering blown-out highlight areas
Method 3: iPhone Photos App — Quick Fixes on Mobile
The native iPhone Photos app handles moderate overexposure quickly without any downloads or extra software. It's not as precise as Lightroom, but it's free, already installed, and works well for most casual photos that need fixing before sharing.
How to fix overexposed photos in iPhone Photos:
- Open the photo and tap Edit in the top-right corner
- Tap Exposure and drag the slider left until highlights look natural
- Tap Highlights and drag it significantly to the left
- Tap Brilliance if skin looks flat after the highlights adjustment — a small rightward nudge helps restore color without bringing back the blown look
- Tap Done to save the edit
All edits in Photos are non-destructive. The original is always preserved, and you can tap Revert at any time to undo every change and start fresh.
For Android phones, Google Photos offers similar controls under Edit > Adjust. Samsung Gallery has an exposure correction panel in its edit mode. Both work on the same principle: pull Highlights left first, then fine-tune Exposure if needed.
The main limit of phone editing is that it works only on the compressed JPEG the camera saved. If your iPhone captured a ProRAW file — available on iPhone 12 Pro and later with ProRAW enabled in camera settings — you'll get better recovery by editing in Lightroom Mobile, which can access that additional highlight data directly.
How to save and store fixed photos securely
Method 4: Photoshop — Precise Control for Complex Photos
Photoshop takes more setup than the other methods, but it offers targeted control for situations where different parts of the same photo need different levels of correction. A blown sky next to a correctly exposed face, for example, can be fixed in Photoshop without touching the face at all.
Fastest approach — Shadows/Highlights adjustment:
- Duplicate the background layer (Ctrl+J / Command+J) to keep the original untouched
- Go to Image > Adjustments > Shadows/Highlights
- Check Show More Options
- Under Highlights, set Amount to 40–60 and Tonal Width to 50–70
- Click OK and compare against the original
Targeted fix — Curves layer with a selection:
- Add a Curves Adjustment Layer via Layer > New Adjustment Layer > Curves
- In the Curves panel, drag the upper-right point of the diagonal downward to darken highlights
- Right-click the layer mask thumbnail and select Apply Image, setting Source to the merged composite and Channel to Gray — this creates a luminosity selection that applies the darkening only to bright areas
- The correction now targets bright pixels most strongly and fades naturally into midtones
This approach lets you darken a blown sky while the face at the same exposure stays untouched. The adjustment is self-masking: it applies strongest where highlights are worst and fades out toward correctly exposed areas automatically.

For most single photos, Photoshop is more than you need. Use it when different zones of the same photo need different levels of correction, or when you're doing additional retouching in the same session.
Common Mistakes When Fixing Overexposed Photos
Darkening the whole image first. Moving Exposure down before touching Highlights applies uniform darkening. Shadows get crushed. The photo looks underexposed rather than corrected. Fix Highlights and Whites first. Add Exposure reduction only after that if the image still needs it.
Using a compressed copy instead of the original. Screenshots, social-media downloads, and re-saved files have already lost the faint highlight gradients that recovery depends on. Track down the original camera or phone file before starting.
Expecting recovery from pure white. Areas that show completely flat white — no gradient, no subtle color, no edge — contain no recoverable data. AI tools and editors can improve the overall balance of the surrounding image, but they can't reconstruct sensor data that was never recorded.
Stopping before checking at full zoom. A photo can look good at normal screen size and still show banding, gray halos, or unnatural skin at 100% zoom. After any exposure correction, zoom to full size and inspect the key areas before saving.
Over-correcting until the image looks dark. Balanced highlights are the goal, not crushed ones. Bright surfaces should still look bright. Whites should look clean, not gray. Skin should look natural. Pull back from correction as soon as the image looks realistic — don't keep going.
When highlights are completely gone with no data left
Frequently Asked Questions
Can I fix overexposed photos without Lightroom or Photoshop?
Yes. AI tools like FixPicAI repair overexposed photos from any browser without editing software. The iPhone Photos app handles moderate overexposure for free on mobile. Snapseed is a free third-party option for iPhone and Android with more precise highlight controls than the native Photos app.
How many stops of overexposure can actually be recovered?
Recovery depends heavily on file format. RAW camera files typically contain two to three additional stops of highlight data compared to the JPEG preview. Original in-camera JPEGs can usually recover about one stop of overexposure before detail is gone. Screenshots and compressed copies have very little recoverable highlight information remaining.
Why does my fixed photo look gray instead of naturally bright?
Pushing Highlights and Whites too aggressively makes bright areas look dull rather than bright. Start with Highlights at -60 and evaluate before going further. Adding a small amount of Clarity (10 to 15 points) or Vibrance (10 points) after exposure correction restores the sense of light and color without bringing back blown highlights.
Should I adjust Highlights or Exposure first?
Always start with Highlights before touching Exposure. The Highlights slider targets only the bright tonal zones and leaves midtones and shadows alone. Exposure shifts the entire image uniformly. Starting with Highlights often resolves the overexposure entirely, with no Exposure adjustment needed at all.
Does AI repair produce results as good as manual Lightroom editing?
For JPEG files, AI repair often produces comparable results to manual Lightroom editing and takes far less time. The main advantage Lightroom has is RAW file access — if you have the original RAW file, Lightroom will recover more highlight detail than any AI tool working from the JPEG alone. For phone photos and downloaded images, the quality difference between AI and manual editing is usually minimal.
What if fixing the overexposure makes one part of the photo look better but another part look worse?
That's the situation where Photoshop's targeted approach — a Curves layer with a luminosity mask — helps most. You can apply different levels of correction to different areas. AI tools also help here because they analyze the scene holistically, often handling mixed-exposure photos better than a single global slider adjustment would.
Conclusion
Most overexposed photos can be fixed. The best method depends on the file you're starting from and the tools you have available.
RAW camera file? Start in Lightroom with the Highlights and Whites sliders. JPEG on your phone? The iPhone Photos app or Snapseed handles moderate overexposure in five minutes, or use AI repair if you want a faster result with less effort. Complex photo where different zones need different corrections? Photoshop's targeted tools give you the control you need.
The original file always gives the best outcome. Find the highest-quality version before you start, and stop correcting when the photo looks natural — not when you've pushed every slider as far as it goes.
Complete photo repair guide covering overexposure and five other problems Process a full batch of overexposed photos at once